
Mastering Exception Handling in BPMN: Separating Normal Flow from Exception Flow
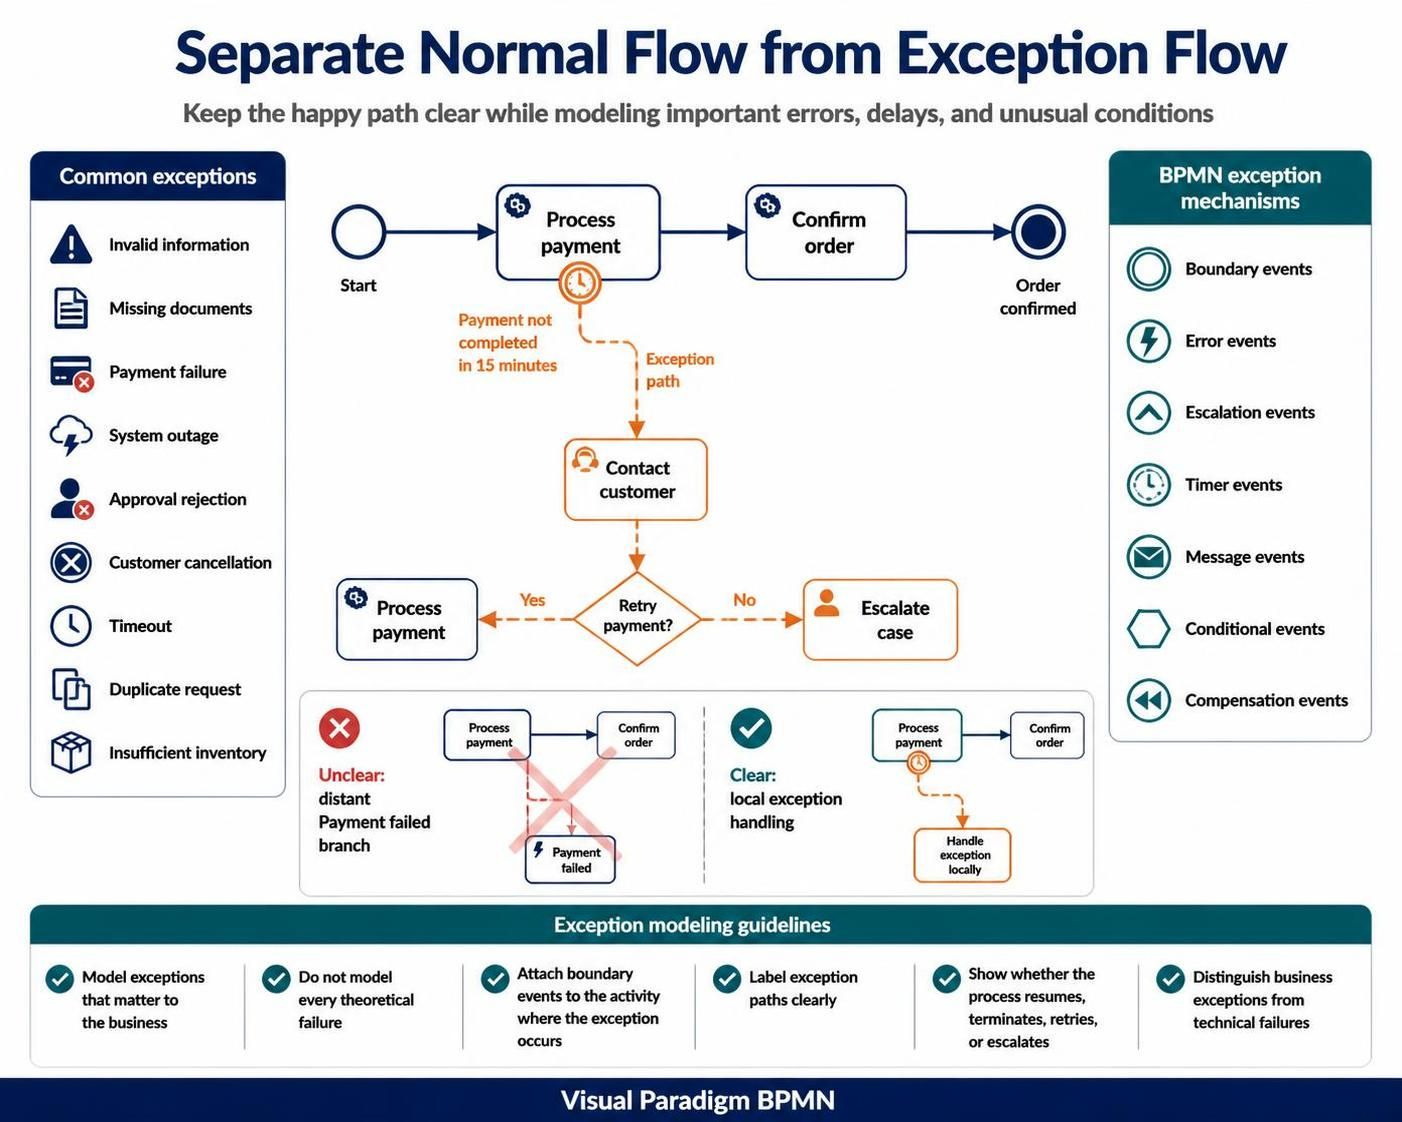
In the world of Business Process Management Notation (BPMN) and system architecture, the most common pitfall for beginners is cluttering their diagrams with every possible error scenario. This creates “spaghetti diagrams” that are difficult to read and maintain. The golden rule of effective process modeling is to separate normal flow from exception flow.
This tutorial explores the architecture of robust process modeling. We will walk through how to keep your “happy path” clear while strategically handling errors, delays, and unusual conditions using BPMN mechanisms.
1. The Philosophy: Keep the Happy Path Clear
When modeling a business process, the primary goal is to visualize the ideal scenario—the sequence of steps that leads to success. In the context of an online order, this is the path from “Start” to “Order Confirmed.”
However, real-world processes are messy. They include:
- Errors: Invalid data, missing documents, or system outages.
- Delays: Timeouts or waiting for external approvals.
- Cancellations: Customer requests to stop the process.
If you model every single failure mode inline with the main process, the diagram becomes overwhelming. Instead, we must model these exceptions without disrupting the visual clarity of the primary process path.
2. Common Exception Scenarios
Before modeling, you must identify which exceptions are critical to the business. Based on standard process modeling practices, here are the most common exceptions that require explicit handling:
- Invalid Information: The user enters wrong data.
- Missing Documents: A required file is absent.
- Payment Failure: The credit card is declined.
- System Outage: The server is down.
- Approval Rejection: A manager denies a request.
- Customer Cancellation: The user stops the transaction.
- Timeout: The process takes too long.
- Duplicate Request: The same order was submitted twice.
- Insufficient Inventory: The item is out of stock.
3. The Architecture of Exception Handling
BPMN provides a rich set of mechanisms to handle these scenarios. The most effective way to visualize this is often through Boundary Events.
Example: The Payment Timeout
Consider a process where a customer pays for an order. A critical exception is if the payment gateway does not respond within a specific timeframe.
Instead of placing a “Payment Failed” branch at the end of the diagram, we attach a Timer Boundary Event directly to the “Process Payment” task. This visually isolates the exception to the specific point where it can occur.
graph TD
    A[Start] --> B(Process Payment)
    B --> C{Payment Successful?}
    C -- Yes --> D[Confirm Order]
    C -- No --> E[Contact Customer]

    subgraph Exception Path
    B -.->|Timeout| E
    E --> F{Retry Payment?}
    F -- Yes --> B
    F -- No --> G[Escalate Case]
    end
As illustrated in the code above, the exception logic flows locally. This is much clearer than placing a distant “Payment failed” branch somewhere else in the diagram.
4. Visualizing Complexity: Clear vs. Unclear
One of the most important architectural decisions in diagramming is deciding how to represent the exception path. Let’s compare two approaches using the “Process Payment” task.
The Unclear Approach: Distant Branches
In this scenario, the main flow proceeds normally, but a separate, disconnected line loops back from a distant “Payment Failed” box to the start. This creates visual noise and makes it hard to trace the logic.
graph LR
    Start[Start] --> Pay[Process Payment]
    Pay --> Confirm[Confirm Order]
    Pay --> Fail[Payment Failed]
    Fail -.-> Start

    style Fail fill:#f9f,stroke:#333,stroke-width:2px
    style Pay fill:#ff9,stroke:#333,stroke-width:2px
The Clear Approach: Local Exception Handling
Here, we use a Boundary Event (the clock icon) attached directly to the task. The exception path is clearly labeled and separated, keeping the main flow linear and clean.
graph LR
    Start[Start] --> Pay[Process Payment]
    Pay --> Confirm[Confirm Order]
    Pay -.->|Timeout| Handle[Handle Exception Locally]

    style Pay fill:#ff9,stroke:#333,stroke-width:2px
    style Handle fill:#f96,stroke:#333,stroke-width:2px
5. BPMN Exception Mechanisms
When building your architecture, you have several tools in your toolbox. The image highlights the standard mechanisms available:
- Boundary Events: The primary way to handle exceptions. They are attached to the activity where the error occurs.
- Error Events: Used to signal that a specific error has occurred (e.g., a technical error).
- Escalation Events: Used when a task takes too long or is not resolved, triggering a higher-level intervention.
- Timer Events: Used for timeouts (as seen in our payment example).
- Message Events: Used when an external message triggers a change in flow.
- Conditional Events: Used to branch based on specific conditions.
- Compensation Events: Used to “undo” actions if a transaction fails later in the process.
6. Exception Modeling Guidelines
To ensure your diagrams remain professional and readable, adhere to these strict guidelines:
- Model exceptions that matter to the business: Do not model every theoretical failure (e.g., “lightning strike”). Focus on business-critical risks.
- Do not model every theoretical failure: Avoid over-engineering the diagram with edge cases that rarely happen.
- Attach boundary events to the activity: Place the exception handling logic directly on the task where the exception can occur.
- Label exception paths clearly: Use distinct colors or text (e.g., “Timeout” or “Error”) to distinguish these paths from the main flow.
- Show the outcome: Clearly indicate whether the process resumes, terminates, retries, or escalates.
- Distinguish business from technical: Ensure you are modeling business rules (e.g., “Customer Cancellation”) separately from technical glitches (e.g., “Server Down”).
7. Controlling Complexity with Subprocesses
Finally, remember that large diagrams are difficult to understand. If your exception handling logic becomes too complex, consider using Subprocesses. Subprocesses allow you to present the process at multiple levels of detail, keeping the high-level view clean while hiding the complex exception logic inside a collapsible block.
By separating your normal flow from your exception flow, you create a system architecture that is resilient, readable, and easy to communicate to stakeholders.