Building software requires more than just writing code. It demands a clear understanding of how different pieces of data and logic interact. Object-Oriented Analysis and Design (OOAD) provides the framework for this understanding. At the heart of OOAD lies the class diagram. It serves as the blueprint for your system, mapping out the structure before a single line of code is typed. However, many developers find themselves overwhelmed by the complexity of these diagrams. They can become tangled webs of boxes and arrows that are impossible to follow.
This guide walks you through creating your first class diagram with clarity and purpose. We will focus on the fundamentals, ensuring you build a solid foundation without unnecessary confusion. By following these steps, you can translate abstract requirements into concrete structural models.
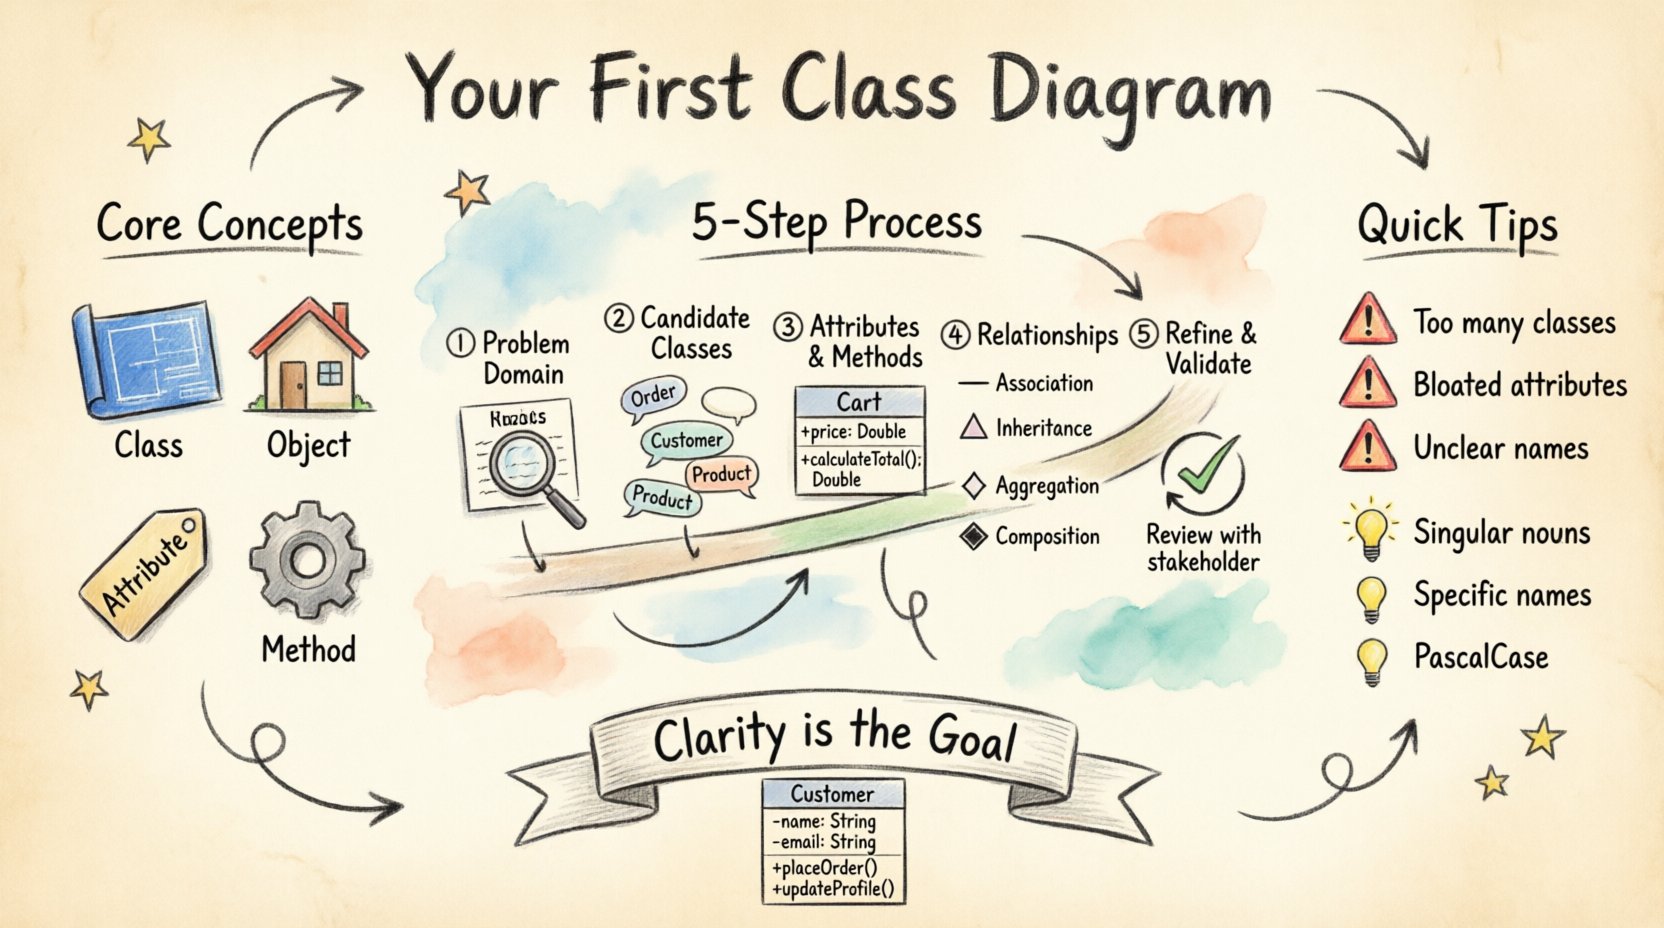
Understanding the Core Concepts 🧠
Before drawing lines and boxes, you must understand what you are drawing. A class diagram represents the static structure of a system. It shows classes, their attributes, operations, and the relationships among objects.
- Class: A blueprint for creating objects. It defines a set of attributes and methods that will be common to all objects of that type.
- Object: An instance of a class. If the class is the blueprint, the object is the actual house built from it.
- Attribute: Data stored within a class. Examples include name, price, or status.
- Method: A function or behavior that an object can perform. Examples include calculateTotal or updateStatus.
Think of a class diagram as a map. It does not show the flow of traffic (that would be a sequence diagram), but it shows the roads, intersections, and buildings that exist. This static view is crucial for developers to understand the system’s anatomy.
Step 1: Identify the Problem Domain 🌍
The first step in OOAD is understanding what problem you are solving. You cannot design a solution without knowing the context. Start by analyzing the requirements.
- Read the Requirements: Look for nouns and verbs in the specification.
- Identify Key Entities: What are the main things in the system? (e.g., Customer, Order, Product).
- Define Boundaries: What is inside the system and what is outside? This helps you decide what to include in the diagram.
For example, if you are designing a library system, the key entities might be Book, Member, and Loan. If you are building an e-commerce site, you might focus on Cart, Payment, and Inventory.
Step 2: Find the Candidate Classes 🔍
Once you have your entities, you need to turn them into classes. This process is often called noun analysis.
- Scan the Text: Highlight all nouns in your requirement document.
- Filter: Not every noun is a class. Distinguish between concepts that need storage and those that are just descriptions.
- Group: If you find multiple nouns that describe the same concept, merge them into one class.
Consider the distinction between a Customer and a User. Are they the same? If the system only tracks one type of account holder, you might just use Customer. If there are distinct roles with different behaviors, you might need separate classes or a hierarchy.
Step 3: Define Attributes and Methods 🛠️
With the classes identified, it is time to flesh them out. This is where the design becomes specific.
Defining Attributes
Attributes represent the state of the class. When listing attributes, consider the following:
- Essential Data: What information is absolutely necessary for the class to function?
- Data Types: Define the type of data (e.g., String, Integer, Date).
- Visibility: Determine if the attribute is public or private. Private attributes protect data integrity.
Defining Methods
Methods represent the behavior. What can this class do? Ask yourself:
- Actions: What verbs are associated with the noun?
- Calculations: Does the class need to compute values based on its attributes?
- Communication: Does the class need to trigger actions in other classes?
For a Product class, an attribute might be price (Decimal), and a method might be applyDiscount (Boolean).
Step 4: Establish Relationships 🕸️
Classes do not exist in isolation. They interact with one another. These interactions are modeled as relationships. Getting this right is often the most challenging part of OOAD.
There are four primary types of relationships you need to understand:
- Association: A generic link between two classes. One object knows about another.
- Inheritance: A specialized relationship where one class is a specific version of another.
- Aggregation: A whole-part relationship where the parts can exist independently.
- Composition: A strong whole-part relationship where the parts cannot exist without the whole.
Use the table below to distinguish between aggregation and composition.
| Relationship Type | Definition | Example |
|---|---|---|
| Association | A simple link between objects. | A Student is enrolled in a Course. |
| Inheritance | A “is-a” relationship. | A Car is a Vehicle. |
| Aggregation | “Has-a” relationship; parts can exist independently. | A Department has Employees (employees can exist without the department). |
| Composition | Strong “has-a” relationship; parts depend on the whole. | A House has Rooms (rooms do not exist without the house). |
Step 5: Refine and Validate 🔄
Once your diagram is drawn, you must review it. This phase ensures the design is robust and maintainable.
- Check for Cycles: Avoid circular dependencies where Class A depends on Class B, which depends on Class A.
- Verify Multiplicity: Define how many instances can be linked. Is it one-to-one, one-to-many, or many-to-many?
- Ensure Cohesion: Ensure that all methods and attributes within a class belong logically to that class.
- Minimize Coupling: Try to reduce the number of dependencies between classes to make the system easier to change.
Common Pitfalls to Avoid ⚠️
Even experienced designers make mistakes. Being aware of common errors can save you time during development.
| Mistake | Consequence | Correction |
|---|---|---|
| Too Many Classes | System becomes fragmented and hard to navigate. | Combine related classes into a single unit. |
| Too Many Attributes | Class becomes bloated and difficult to manage. | Move unrelated attributes to a new class. |
| Unclear Names | Developers confuse the purpose of the class. | Use descriptive, business-oriented names. |
| Ignoring Constraints | Logic errors occur at runtime. | Add constraints like min, max, or unique to attributes. |
Best Practices for Naming 📝
Names are the most important part of a class diagram. They communicate intent better than any comment.
- Use Singular Nouns: Name classes as singular entities (e.g., Customer instead of Customers).
- Be Specific: Avoid generic names like Data or Info. Use OrderDetails or TransactionLog.
- Follow Conventions: Adhere to standard naming conventions for your language (e.g., PascalCase for classes).
- Avoid Abbreviations: Unless they are universally understood, spell out terms to avoid confusion.
Advanced Considerations 🔧
As you gain experience, you will encounter more complex scenarios. Here are a few advanced topics to keep in mind.
Interfaces and Abstract Classes
Sometimes, you need to define a contract without implementing the behavior. This is where interfaces come in. An interface defines methods that a class must implement. Abstract classes provide a base implementation that can be shared among subclasses. Use these when you need flexibility in your design.
Design Patterns
Patterns are proven solutions to common design problems. While not strictly part of the class diagram syntax, patterns influence the structure. For example, the Singleton pattern ensures a class has only one instance. The Factory pattern handles object creation logic. Recognizing these patterns in your diagram can improve code quality.
Documentation
A class diagram is a living document. It should evolve as the system grows. Add notes to explain complex logic or constraints that cannot be represented visually. Keep the diagram synchronized with the actual code. A diagram that does not match the code is worse than no diagram at all.
Final Thoughts 🚀
Creating a class diagram is a skill that improves with practice. Start small. Focus on the core entities of your system. Do not try to model every single detail in the first iteration. Refine the diagram as you learn more about the requirements.
Remember that the goal of OOAD is clarity. If a developer can look at your diagram and understand how the system works without asking questions, you have succeeded. Take your time, review your relationships, and ensure your names are clear. With patience and attention to detail, you can build robust systems that stand the test of time.
By following this structured approach, you avoid the common traps that lead to confusion. You will produce a design that is not only functional but also maintainable. This foundation sets the stage for successful implementation and long-term project health.

